How to Create a New Customer Project

A new project must be created in JIRA when we gain a new customer or begin a new initiative or feature with an existing customer. The project can be created by a manager, the project leader, or an administrative person.
(If this task is assigned to an administrator, a manager or the project lead should provide the following: Name of Project, 4 letter Key, Project Lead name, Users and Developers assigned to project, Customer Developer and User, and Category.)
- In JIRA, click on the gear symbol at the top of the page, select Projects Admin. On
Project List page click on the +Add Project button at the top right.
- Select Project Type: Software Development, Agile Scrum, Bug Tracking, Project Management, Agile Kanban. OD projects will generally be Software Development, but confirm with manager. Click Next.
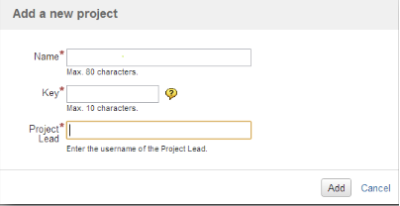
- Add a new project: The Name and Key must reflect not just the company name, but also a reference to the specific software, functionality, or project. The Key should be 4 letters, all capital, which are representative of the project and somewhat intuitive. Click on Add.

On the Project page, there are several items from the left-hand menu which must be customized for use by Oasis Digital.
- Select Issue Types from the menu. Click on Actions, select Use different scheme. From the pull-down menu, select Oasis Digital scheme and click on OK.
- Select Workflows, then Switch Scheme. Select Oasis Digital 1.2 from the pull-down menu and click on Associate. If JIRA displays a message of “No Issues”, just click Associate again.
- Select Roles from the left menu. You must remove the automated groups to create the correct roles for the project.

- Click on Users, then click the X to delete that group from the user category. In the Begin to find users box you can type in the users you need, selecting individuals from the list that pops up (again, this information must be provided by a manager or project lead). Select Update.
- Delete the Developers group, then add actual developers as needed. Select Update.
- Add Customer Developer and Customer User as appropriate.
- Administrators group can be left in place. Return to main page.
- Select Permissions and click on Actions. Under Use a different scheme, select Project Permission Scheme from the pull-down menu. Click on Associate.
- Select Issue Security, then click on Actions. Select Scheme, Oasis Digital Internal, click on Next, click on Associate.
- Select Notifications, click on Actions. Select Use a different scheme, then Project Notification Scheme from pull-down. Click on Associate.
The final steps in creating the project are selecting a Project Category and creating an Avatar.
- At the top of the Project Admin page, click on Category: Not Categorized. Select the appropriate category (provided by manager or project lead).
- Retrieve the logo of the customer or the software from the Splash page or customer website by saving the image or performing a screen capture.
- Select the Edit Project button at the top of the page. Click to Edit the Avatar and insert the logo.
