
Installing JIRA Data Center in AWS EC2 with Active Directory and SQL

Hello, this is Jack Balbes with Expium’s JIRA Boot Camp. This video is an explanation of how to set up JIRA Data Center in the Amazon Web Services cloud. To do that, we’re going to set up a Virtual Private Cloud and then, inside of that, we’re going to have an Active Directory server, which is going to be taking care of the login permissions for JIRA. We’re going to have a Linux server running the actual JIRA Data Center (the software itself) and then a Microsoft Windows server, which is going to have MS SQL on it for the SQL database that JIRA is going to be using.
So to start off with, we need to actually go ahead and go to Amazon Web Services. So here I am at my AWS console, and I need to create a VPC. So that’s here under Network and Content Delivery. To create my Virtual Private Cloud, I’m going to use this wizard here. So I start the VPC wizard. I’m going to start off with a “one VPC with a single public subnet”. I’m going to give it a name. So this is going to be Expium JIRA. I want it to be in US-west-2a, and then I’m going to go ahead and create. So it’s going to go ahead and set up everything that I need for my Virtual Private Cloud.
The next thing I need to do is add a second subnet to this VPC. So this is my list of subnets. You can see this is the one on the VPC I just created. To create a subnet, I just click on that button up at the top there. This is going to be Public Subnet 2. And we can see here that it is by default associated with that VPC I just created, because that’s the only one I have currently. And I want it to be in a different availability zone. So my first one I put in 2a. This one I’m going to put in 2b. And then I need to make a separate CIDR block. So the first one should be 10.0.0.0. This one we’re going to do 10.0.1.0/24. We create that.
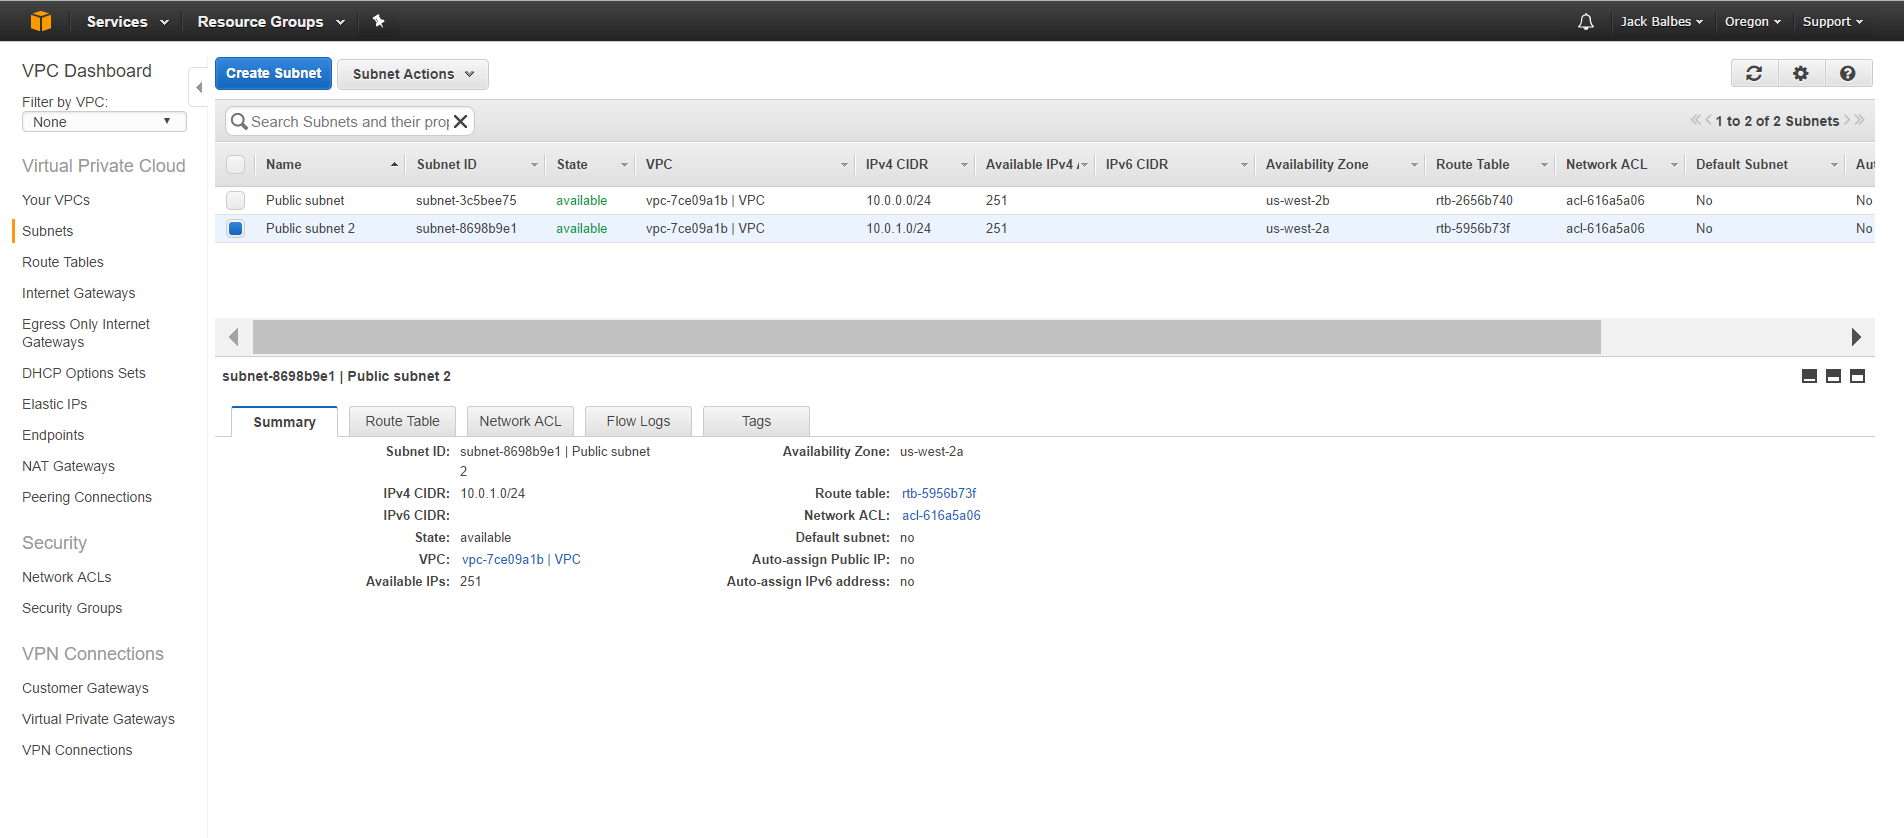
Now I have a Virtual Private Cloud with two public subnets ready to go for me to put my Linux server for JIRA and my Windows server for SQL.
Once I have this setup, I need to go ahead and set up my Active Directory server. So that is going to be under Security Identity and Compliance in Directory Service. What we’re going to do is, we’re going to scroll down here to the bottom and set up a simple AD. I’m going to make this jira.expium.com. The NetBIOS name is going to be JIRAAD. And then I’m going put in a password for the administrator account. I’m going to put that in twice. Smallest size is fine. I want to make sure that it’s on the VPC that I just set up. So that’s that one. And then this is going to span both subnets. So this is the reason that we needed to create two. This is the one that came with the VPC that I just created, and this is the one that I added on later. We’re only going to use one of these, but an Active Directory needs two of them at least, so we had to create the second one. Then we’re going to review all of our steps and then we can go ahead and create this simple Active Directory.
Once that is done, we can go ahead and view the directory details, and we can see here is our simple Active Directory it is currently creating. Soon that will shift to running and then we can move on to the next step.
Now that we have our Active Directory instance up and running, we can set up our two servers. To do that, we’re going to go ahead and go to Services EC2. First we’re going to set up our Windows servers. So here I’m going to go to my list of running instances, and then I’m going to say I don’t have any right now. I want to launch one.
We’re going to set up a SQL server first. Here we have Microsoft Windows Server 2016 with SQL Server Express. We’re going to select that. The Micro Free tier is a little bit too small for our purposes. We’re going to go ahead and go with the Medium. And then we’re going to configure the details. So we want it to be on our VPC that we just created. We want it to be on one of the two subnets. So it doesn’t matter which one you put it in. You just want to have both your Windows SQL server and your Linux JIRA server on the same subnet so they can talk to each other. So I’m going to put this one on 2a. That means I’m going to need to also put the Linux one on 2a in just a moment. Then we also want to enable auto assigning of public IP. This will allow us to connect to this machine and make changes to it. We’re going to join a directory. Once our Active Directory is up and running, we should have the option to click on that. I’m going to pause the video here and wait for that to happen.
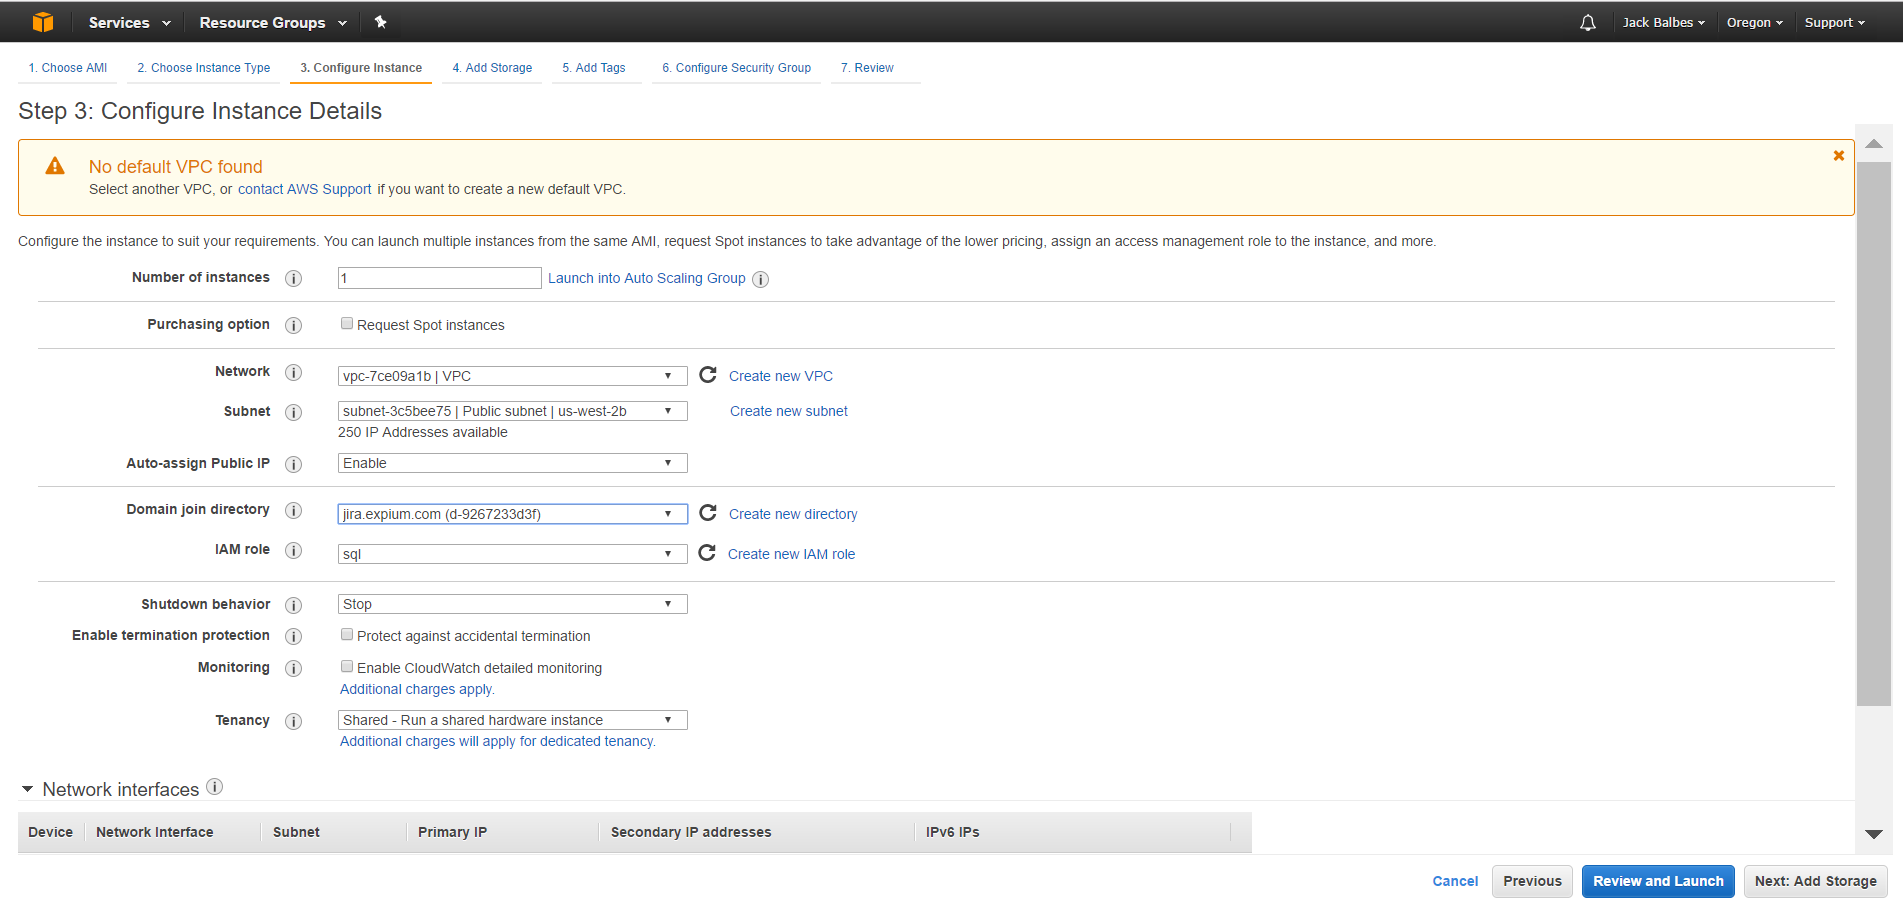
We can see that it has now appeared in this dropdown menu because it has finished creating. So I’m going to select that. And then I have a role here already. You can click on this button to go and create one. You do need to assign at least one role but the details of what this is doesn’t matter. And then that is everything that we need on this screen. So 50 gigabytes is going to be more than enough. Add a name here. So I’m going to call this ExpiumJIRASQL.
So here, you can notice that this already has the SQL server port open. That’s good. And RDP–that’s how we’re going to connect to it–is via remote desktop protocol. Then that should be good enough for this machine. So we’re going to go ahead and review and launch. Note that this will cost money, so for this instance, for this demo, it’s not going to cost all that much. It will probably be less than a dollar, but be aware of that. So we’re going to go ahead and launch. I already have a key pair set up, so I’m just going to use that one, but you can also create one here. If you create one there, it will download the file, and you’ll need that later.
Now we can go ahead and view my running instances and see that my Expium JIRA SQL server is initializing, and now we can move on to creating the Linux server.
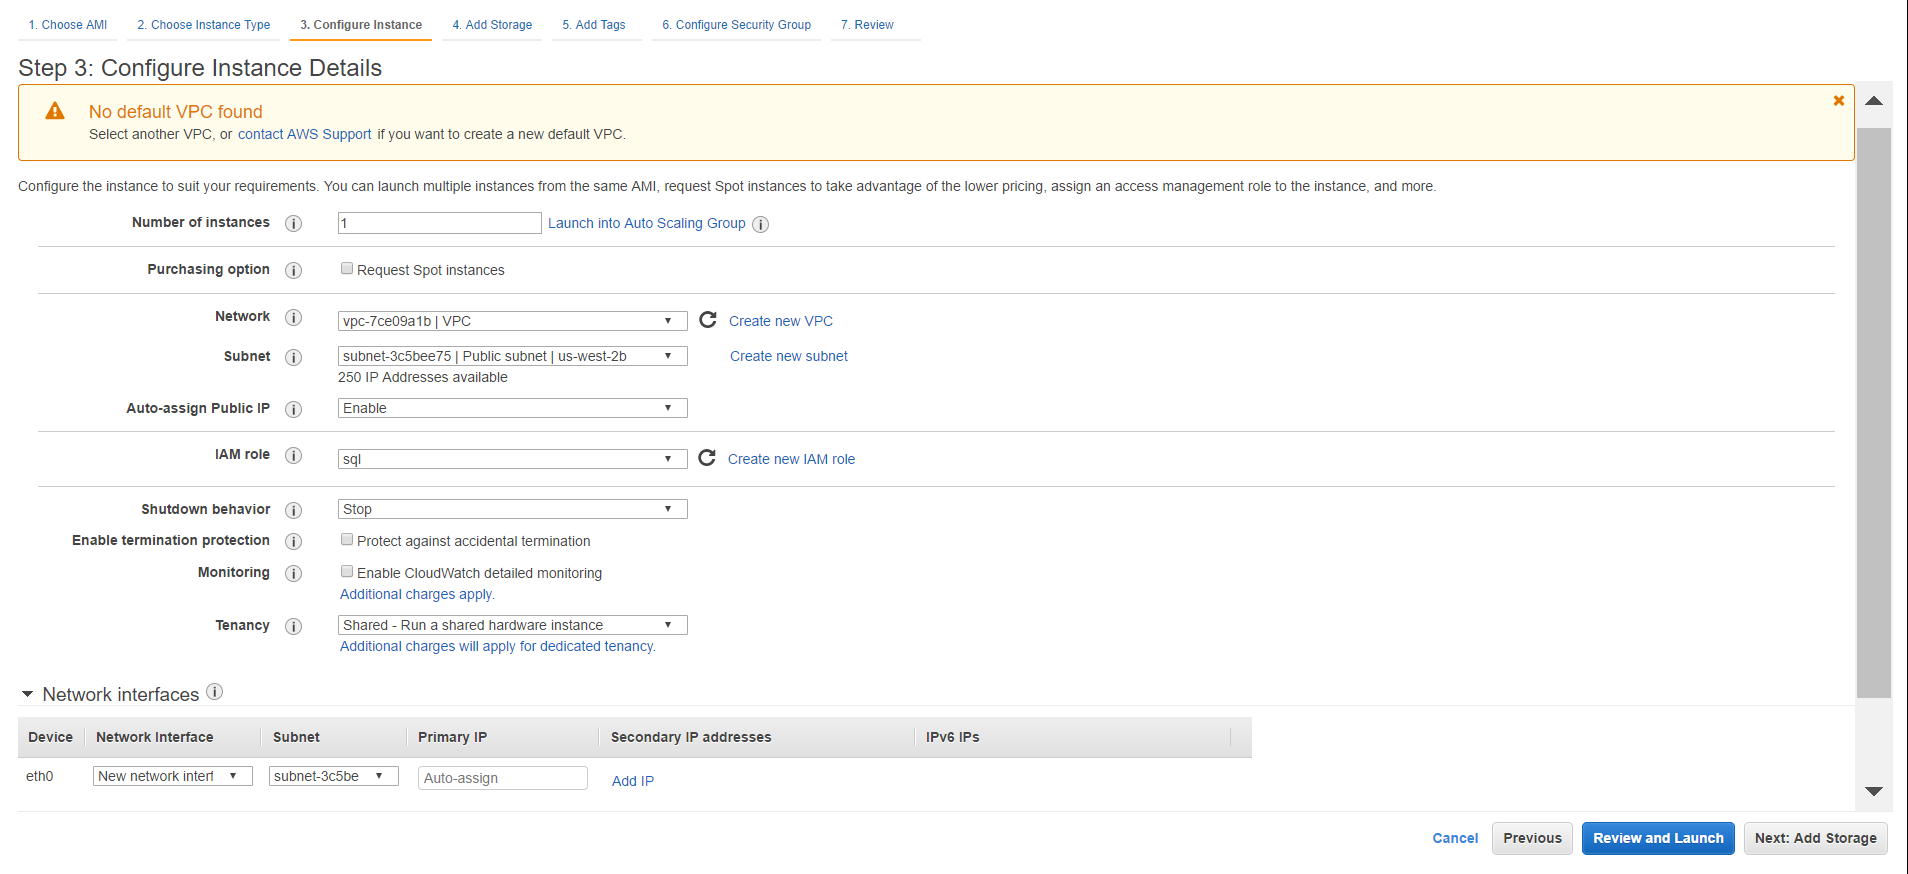
To do that, we’re going to go ahead and want to launch another instance, and this time, we’re going to use this first one, this Amazon Linux AMI. So we’re going to go ahead and select that. In this case, we don’t quite need a Medium. A Small should be okay. You could probably go Free, but it would cause this to lag a little bit so I’m going to go ahead and bump it up just a bit. We’re going to configure some details. So make sure it’s on your VPC. Make sure it’s on the same subnet as the previous one. The previous one I put on 2a, so I’m going to do that with this one as well. Again, we’re going to go ahead and enable a public IP so we can talk to that and then assigning the IAM role.
Note that we don’t join a directory service here because this isn’t Windows. Active Directory is a Windows thing. So because this is Linux, not Windows, we don’t need to do that. Next, adding storage, eight gigabytes is fine. This is going to be adding a name, this is ExpiumJIRALinux. Security group, we are connecting via SSH. So this is going to allow us to talk to this computer and set it up, but we also want to enable JIRA.
What we want to do is, we’re going to go ahead and open up port 8080 to traffic from anywhere. Then we’re going to go ahead and review. Everything looks good,so we’ll go ahead and launch. Again, I have an existing key pair. You can you use the key pair that you generated for the previous instance, the Microsoft Windows SQL Server, and that’s just fine. We’ll go ahead and acknowledge that we have this key already. And now my instance is launching. If we look back at the console here, we can see that my SQL server is up and running. My Linux server is currently setting up. So I can go ahead and start working on setting up my SQL server while the Linux server is initializing.
To connect to Microsoft SQL server, we’re going to need to use Remote Desktop. This is a feature built into Windows that you can just use to connect to remote PCs. So here, when it asks what computer we want to connect to, we’re going to give it the public IP address of our Windows SQL Server. That is going to be right down here. Your number will be different, so don’t try mine because it won’t exist. I type in 52.41.181.78. I want to connect as administrator. To get that, I just clicked on the More Options. I “connect”, and it’s connected. And so the password that you entered for the administrator password when you created the Active Directory is what you need to type in right here. So if I go… this is just saying that it has a self-signed certificate, and now I can bring this over here, and we have… It is logging in to the SQL server, and something weird is going on with my UI scaling.
We’ll give that a couple minutes to get itself set up after our first-time login.
I had to wait a few minutes for it to login all the way, but now we are inside our SQL server, so we can go ahead and get this all set up. The tool that we’re going to need for that is SQL Server Management Studio. I just start typing right here, it should bring that up. I just typed in SQL, and once it gets through that, it will bring me the right thing. There we go.
SQL Server Management Studio, we’re going to open that up. Now that Microsoft SQL Server Management Studio has finished it’s first-time setup, I’m going to go ahead and connect using Windows authentication, and then I’m going to start setting up my SQL database. The first thing that I’m going to do is go to Properties. I right clicked over here, went to Properties, and clicked on Security, and I’m going to set it to allow SQL server authentication in addition to Windows authentication. And notice that I’m going to have to restart SQL server, so we’ll do that in just a moment.
Before we do that, we’re going to go ahead and make a new login. We right click on Security. Go to New, Login, and here we’re going to create a new Login for JIRA to use. This is going to use SQL server authentication. I’m going to say this is JIRAUSER. Password is going to be this, and then I’m going to turn off enforcing the password policy because this is not going to last that long. Then under server roles, I’m going to say this is a DB Creator. So this is going to allow this user to create and update a database. Hit okay.
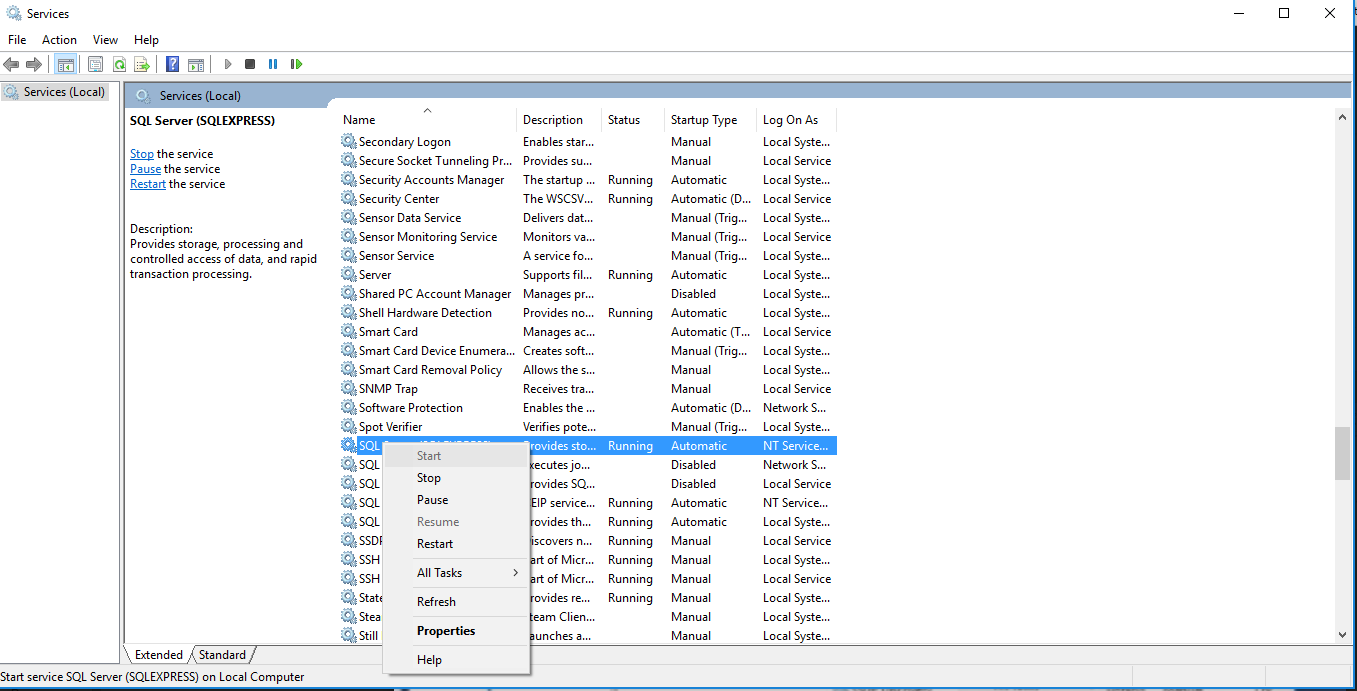
Now I’m going to go and restart the SQL server. To restart the SQL server, you can come down here and search for Services. This will bring up this screen right here. I scroll down to SQL server. I want MS SQL Server…this is the one. I restart this, and it’s going to restart some other dependent services, but that’s fine.
An important thing to note: I should disconnect from here. I think everything has restarted.
Now I’m going to go ahead and connect using that user that I just created. This was JIRAUSER and my password, and now I’m going to make a database. Right click on Database, New Database, and this could take a couple of minutes.
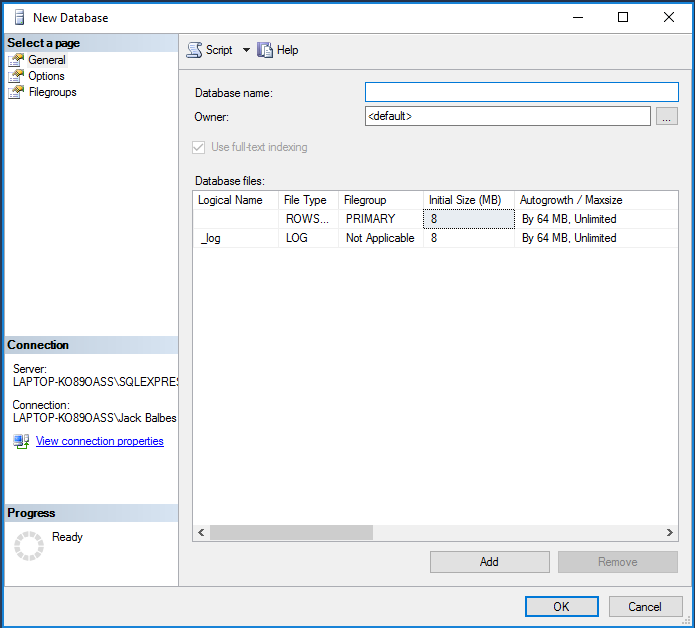
I had to wait a minute, and then this dialog came up. I’m just going to name my database JIRA and hit okay. Now we can see under here I have the JIRA database. With that, our Windows SQL Server is all set up for us to use it with JIRA. Let’s go ahead and switch over to the other box, the Linux box, and start setting that up.
We can go ahead and close our Remote Desktop connection. We’re not going to need it anymore. And then I’m going to use SSH over the command line to connect with my Linux box. Here’s the terminal that I’m going to use to do that. And here is the command [ssh -i JIRA-KEY.pem ec2-user@12.345.67.89].
So SSH is a program to connect to a remote computer similar to RDP but, again, at the command line. That “-i” is saying, “Here’s a key that we’re going to use to identify ourselves.” This is the key that I downloaded earlier. Remember how I said when we were creating these instances that I already had a key? Well, this is that PEM file that I downloaded, and you should have downloaded when you created your key earlier. This is the path to that file from the C drive. This fully-qualified path is what you need. Yours might be different if you have yours in a different place, but I’m just keeping mine in documents.
The next thing that you need is this EC2-user is the username that you’re going to use to log in as. And then @ the IP address of your Linux server. You can see that my number here matches with this number right over here. I have to put in the IP address of my Linux server. If I hit enter, it’s going to go ahead and connect. I am now connected to my Linux server. So with that, I can go ahead and start downloading JIRA.
I happen to know the URL of the file I need to download to install JIRA is this one right here. This is the URL to install the Linux version of JIRA Data Center. I’m downloading it using this wget command [wget https://url ], so wget and then some URL means just go and download that file. So when I hit Enter, we’re going to go ahead and download this file.
Now we need to run this file to install JIRA, but the permissions are not quite set up the right way, so we need to change those permissions using the chmod command. So we’re going to chmod 700 and then the file name [chmod 700 filename]. This is setting the permission so that we can actually run this file. And then we’re going to sudo./ and then the file name. So what this is going to do is, it says, “Do as a superuser this thing here.” We’re going to go ahead and run that. This is setting up JIRA at this point. We want to install JIRA on this computer. We’re going to hit “0” and enter. Then I’m going to go ahead and do a custom install, so “2”, enter. The default here is fine. Default here is fine. We want to use the default ports. Remember we opened up port 8080 before. This is why that’s important, because we do this.
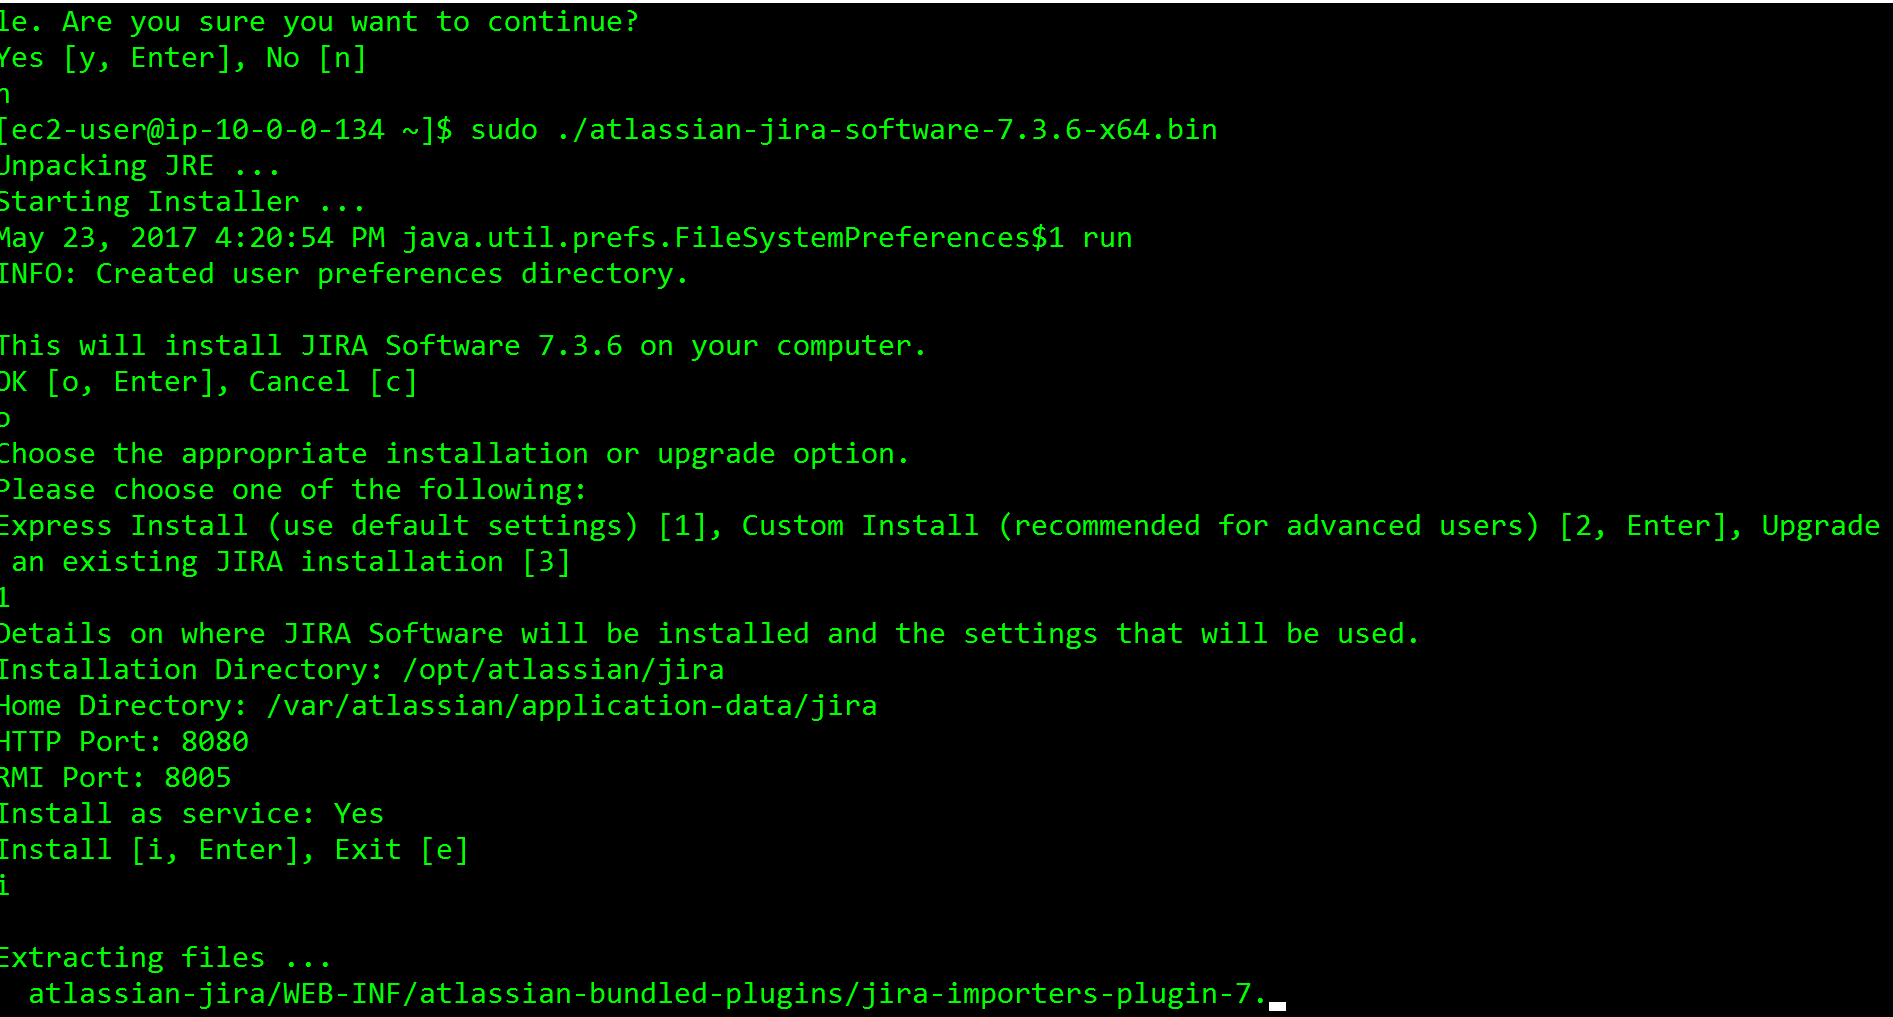
Here we’re going to have JIRA run in the background as a service, and then we’re going to go ahead and install. This is now setting up JIRA for us. We want to go ahead and start it.
Now JIRA is up and running. If we go and we look at this URL… We can get this IP address, and then this is going to be that IP address…at port 8080. We can see that JIRA is loading up, and it is ready to be set up. There’s one last thing we need to do before we can finish setting it up, and that is editing a file on the Linux server. The file that we need to edit is called resolv.conf. This is how this server is resolving domain names. We’re going to need to tell it to use our Active Directory that we set up earlier. We’re going to sudo because we need to do this as a superuser. Nano is a command line text editor, and then it’s located under a /etc/resolv.conf [sudo nano /etc/resolv.conf].
The only change that we need to make to this file — I’m using the arrow keys to move around. You can’t just click into it, unfortunately. We need to change this number to match the URL of the Active Directory that we set up earlier. If we come back over here and we look at directory service, we click here to see the details, and we can see that we have two DNS addresses, one for each subnet. We need to remember which one I put this on. Let me double check here.
My instances are on 10.0.0. That means that I need the 10.0.0 IP address of this directory. If I click on that… 10.0.0.172. If I come back over here, I need to change this to 172 and then Ctrl X will Exit and then Y to Save, and then this file is okay. Now we’ve overwritten that file. Now I need to restart JIRA. To do that, we’re going to type service jira stop. Ah, it needs to be sudo because we need to be a superuser to do this. So “sudo service jira stop”, and then “sudo jira service start”. Simple enough.
JIRA has been restarted, so it now has the updated resolv.conf. Now we can come here, and if we refresh this page, once it’s ready, it will come up. I refresh this page to reconnect, and then we’re going to select, “I’ll set it up for myself.” Now we’re going to go ahead and start setting up our JIRA instance. We want to use my own database. Our database is going to be Microsoft SQL Server. We’re going to put in the host name of our SQL server instance that we put in before, that we set up earlier. If we go here and we look at the details of our SQL server, you want this 10.0.0.76. This is the internal IP address. And then we named our database JIRA. We named our user name JIRAUSER and our password was a password.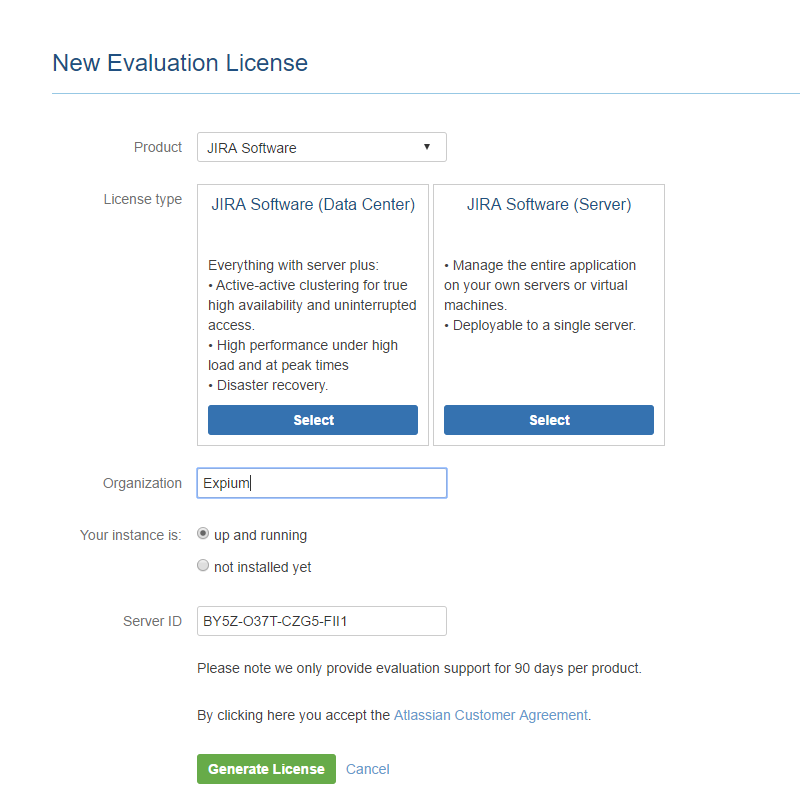
Now we’re going to test the connection. Our connection was successful. So we’re going to hit Next. We’ve set up our database, and now JIRA is going to go ahead and go into that database and do all of its setup. This may take a minute, so we’ll go ahead and pause the recording.
JIRA has finished with the database. I don’t want to save this password. Then we’re going to set up some other things about the JIRA software. All of these defaults for this one are fine, so we’ll go ahead and click next. Now we need to generate a trial license for this setup. If you’re doing this for real, you would put in your license key here, but this is just a demo, so I’m going to go ahead and get a trial license. This is for JIRA Software Data Center.
I click there. All of these are true. That’s up and running, so I just generate the license, and that is the correct IP address. I just put the license right in there. I can go ahead and hit next. This may take a minute, so I’ll go ahead and pause.
It has finished, now I need to set up my administrative account. I’m going to put in my name and then my email address. Then I’m going to have my username and password. We do not want to set up email notifications because we don’t have the support for that. So we’ll just go ahead and click finish. Then I’ll go ahead and pause the video again while this is going on.
We have finished. We want to keep this in English, so I’ll hit continue. I don’t need to choose an avatar. Now we’re to the point where we’re going to start setting up our JIRA. I just want to go ahead and skip past this. A little trick that you can do is if you click on this Import Issues, down at the bottom, you can go ahead and click Skip.

Now we are going to be in our JIRA instance with it all ready to go. Click away some of these notifications. Now we need to point this JIRA instance at the Active Directory so that we can use Active Directory to manage our logins. We’re going to do that under Administration, User Management. Then we’re going to click on User Directories, and we want to Add a Directory, Microsoft Active Directory. Our host name is going to be jira.expium.com. That’s what we called our Active Directory before. Then we’re going to log in as administrator@jira.expium.com, and password, and then our base DN is going to be dc=jira,dc=expium,dc=com. Then we want to have read/write so that they can read and write back and forth to each other, and then we’ll save and test.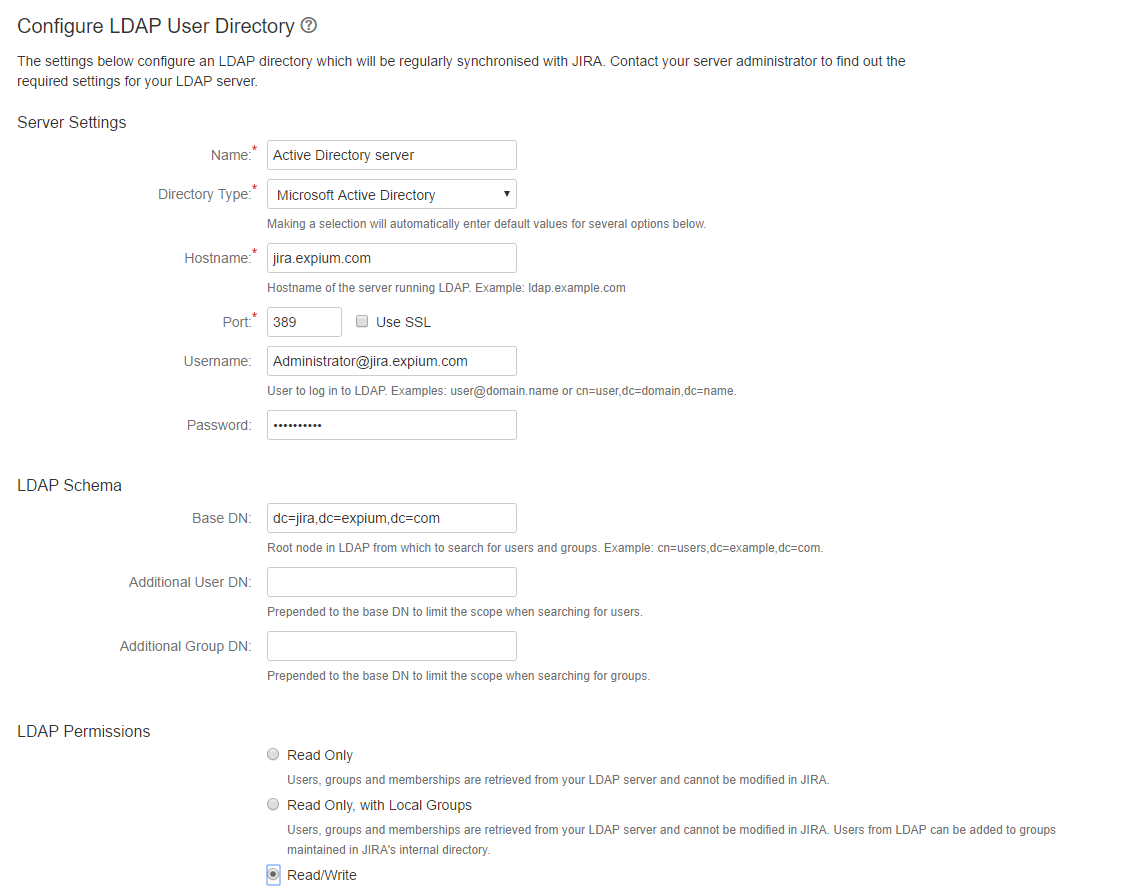
Okay, so we have our initial basic connection established. Now we want to test a user. I’m going to go ahead and add…type in administrator and my password and test the settings. We can see all of my tests passed. Now if we go back to the directory list, we have the JIRA’s internal directory and the Active Directory server. This is the Microsoft Active Directory, and then what we want to do here is we want to synchronize. This is going to go ahead and have JIRA go and pull in all of the users from that Active Directory. Now if we go and we look at the list of users that are allowed to log in to this machine, we have the default administrator, and then we also have an administrator from the Active Directory service.
That is how you set up JIRA software on AWS with Active Directory. I hope you learned something, and good luck.