
Workflows

A JIRA workflow is the set of stages, called statuses that an issue goes through during its lifecycle. Workflows can be centered on a process flow within an organization or based on goals related to the item. For either of these you start with the built-in workflow. This workflow is represented in the diagram below. In order for an item to move between statuses they have to ‘transition”, these are the actions available to the user to move the item. For example “Start Progress” is the transition between the “Open” and “In Progress” statuses.
You can customise a workflow by initially copying the system workflow or creating new workflows from scratch. Each workflow can be associated with particular projects and (optionally) particular issue type(s), via a workflow scheme.
We found this article by Infoware Studios to be very helpful in explaining these concepts to new users.
JIRA’s System Workflow

JIRA workflows consist of steps and transitions:
A step represents a workflow’s current status for an issue. An issue can exist in one step only at any point in time. Each workflow step corresponds to a linked status. When an issue is moved into a particular step, its status field is updated to the value of the step’s linked status. In the diagram above, the blue, yellow, and green boxes represent steps/statuses.
A transition is a link between two steps. A transition allows an issue to move from one step to another step. For an issue to be able to progress from one particular step to another, a transition must exist that links those two steps. Note that a transition is a one-way link, so if an issue needs to move back and forth between two steps, two transitions need to be created.
Use of Workflows
About ‘Open’ and ‘Closed’ Issues
Within JIRA an issue is determined to be Open or Closed based on the value of its Resolution field not its Status field.
- An issue is determined to be Open if its Resolution field has not been set.
- An issue is determined to be Closed if its Resolution field has a value (e.g. Fixed, Cannot Reproduce).
This is true regardless of the current value of the issue’s Status field (Open, In Progress, etc).
So if you need your workflow to force an issue to be Open or Closed, you will need to set the issue’s Resolution field during a transition. There are two ways to do this:
- Set the Resolution field automatically via a post function.
- Prompt the user to choose a Resolution via a screen.
Adding a New Status
Select Administration > Issues > Statuses to open the View Statuses page, which lists all statuses, along with a form underneath to add a new status.
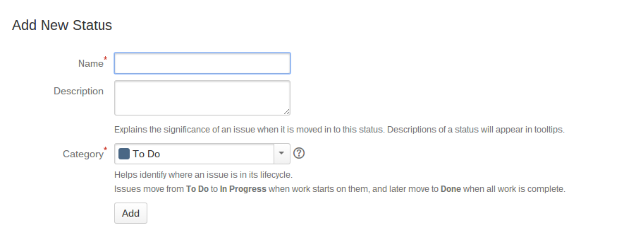
Complete the Add New Status form towards the end of the page. The View Statuses page can be used to edit and delete Statuses.
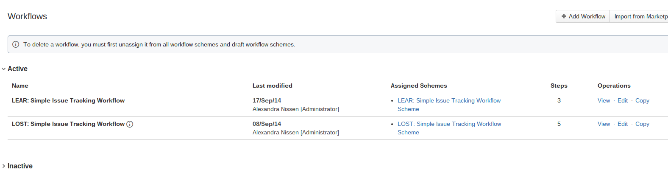
Adding a New Workflow
Select Administration > Issues > Workflows to open the Workflows page, which shows a list of all existing workflows in your system.
Create a new workflow in JIRA using either of the following methods:
1. Create a ‘blank’ workflow by first clicking the Add Workflow button and in the resulting Add Workflow dialog box:
- Type a Name (usually 2-3 words) to identify your new workflow.
- (Optional) Type a detailed Description of your new workflow.
- Click the Add button. The workflow will open in edit mode, showing your new workflow containing a step called Open. If you are viewing your workflow inDiagram edit mode, you will see which has an incoming transition called Create.
2. Copy an existing workflow (useful if your new workflow can created by applying modifications to an existing workflow), by clicking the Copy link next to the existing workflow and in the resulting Copy Workflow dialog box:
- Type a Workflow Name (usually 2-3 words) to identify your new workflow.
- (Optional) Type a detailed Description of your new workflow.
- Click the Copy button. The workflow will open in edit mode, showing the layout of your copied workflow.
To access inactive workflows, click the Inactive list heading to expand the list of inactive workflows.
Once you have created your new workflow (especially if you created a ‘blank’ workflow) you may want to customise it by adding and/or editing steps and transitions as we discussed earlier.
When you have finished customising your new workflow it must be activated by following this steps:
- Create a workflow scheme that references your workflow and optionally associate it with the relevant issue type(s).
- Associate the workflow scheme with the relevant project(s).