
Building JIRA Projects From the Bottom Up

A common mistake new JIRA users fall into is viewing the JIRA structure from a top down perspective only. This perspective wants to start with Projects and Workflows and work down to Issue Types. However, starting with Issue Types and building up provides a much more robust and flexible framework and will likely eliminate any need to start over completely from scratch.
This article will take the basic JIRA framework and walk through an example of a bottom up project build, starting with Issue Types, moving through Fields and Screens, and eventually Workflows and Projects. Note: despite its advantages, the bottom up approach will still require the user to have at least a basic idea of what project he is trying to do as well as what workflows may be needed.
The following is the JIRA Framework:
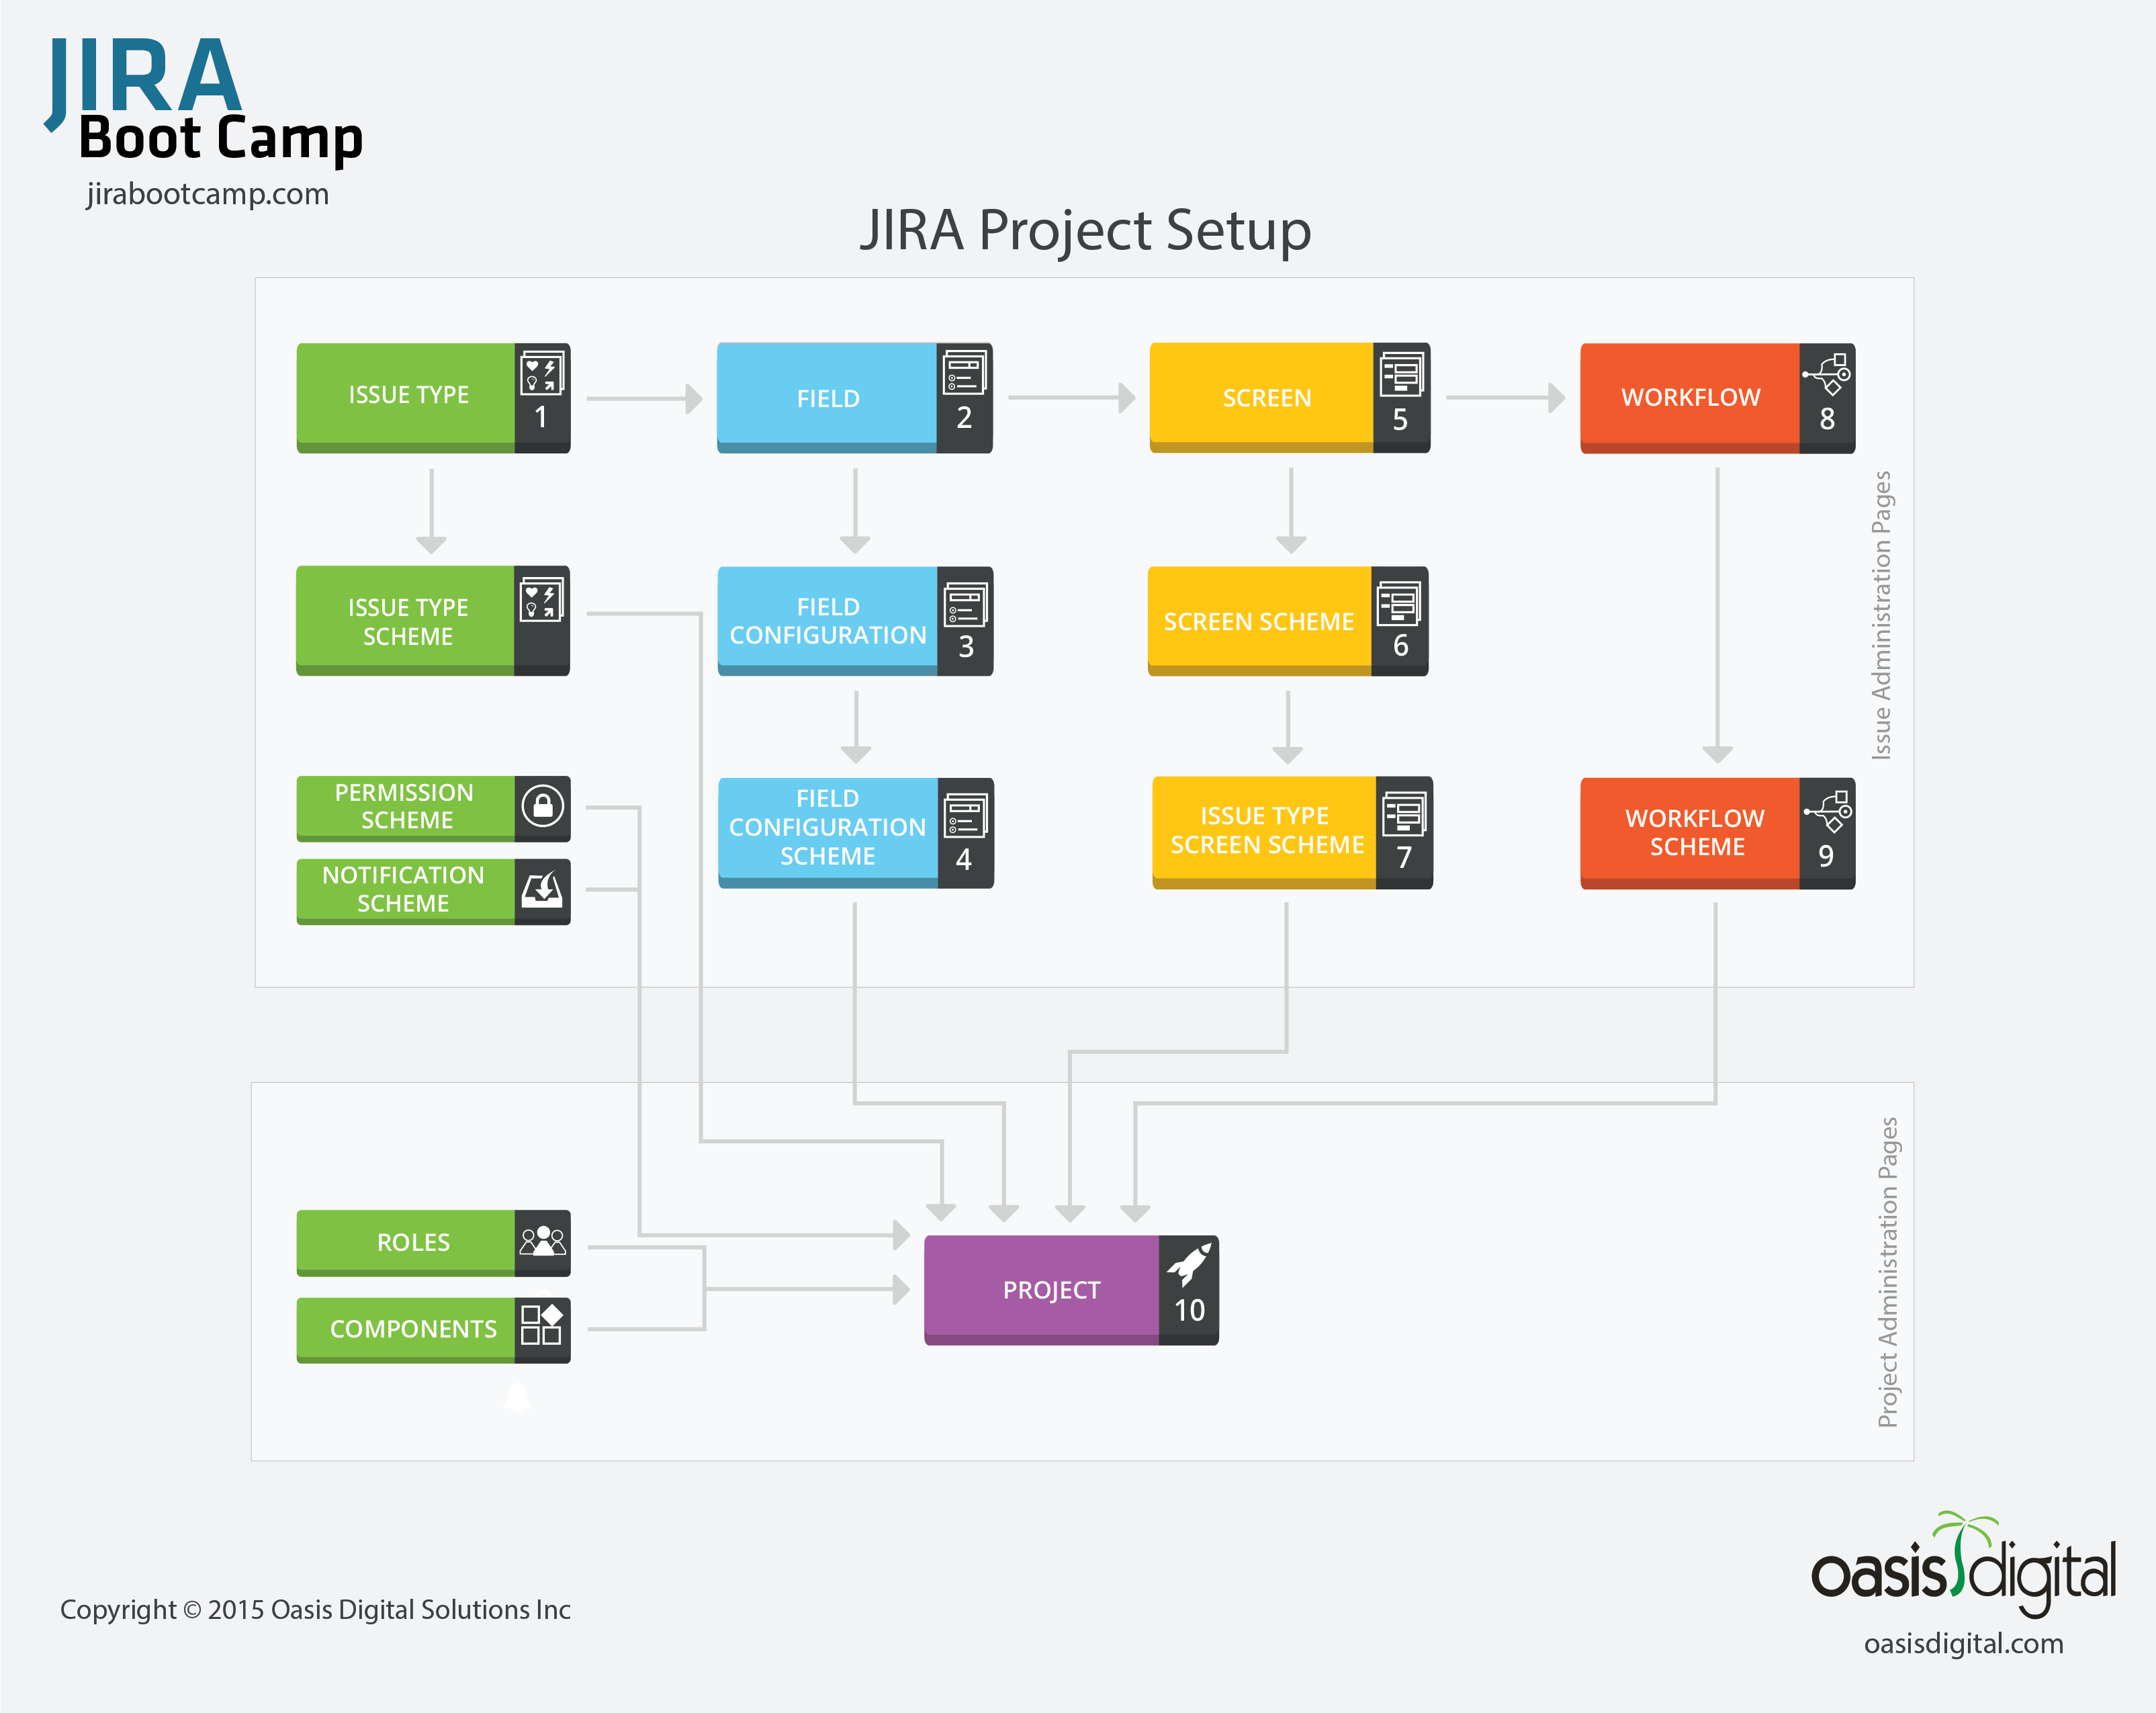
(Click image to enlarge)
Looking at this framework we see several “buckets” and several “connectors” This concept of buckets and connectors is good to keep in mind as we walk through this process.
Let’s say we want to manage a basic project for an asset based company related to maintenance on their assets. A top down approach to this process would be to build a maintenance Workflow. But then the user has no structure whereby to hang that Workflow. It would be like starting to build a house after putting together a blueprint but neglecting to establish what kind of lumber, nails or plumbing will be used. Or proceeding to build the house without defining in the blueprint how large each room would be. The lack of details will quickly become apparent rendering the project completely inefficient.
Instead let’s consider our maintenance project from a bottom up approach starting with Issue Types. What are some of the Issue Types that might be needed to support this maintenance process? Missing parts? insufficient personnel? Asset testing after maintenance? Scheduling? JIRA has several Issue Types that support these types of issues: Tasks or sub tasks, Bug, new feature, Technical task. And other Issue Types can be created as needed.
Start your JIRA construction by selecting Issue Types and creating needed Issue Types if they do not exist already.
Once all the issues have been created we need to combine or bucket all the issues relative to our maintenance project. This bucket will be our Issue Type Scheme and will eventually be assigned to a Project. Each Project can have only one Issue Type Scheme where all Issue Types reside for that Project.
Create an Issue Type Scheme and assign all relevant Issues Types
While the Issue Types help determine the data needed, the Fields provide a way to capture that data. Fields may be basic (date) or customized (list of finite values specific to an issue) JIRA comes with several basic built in fields. Several of these are built into every screen (Summary, Comments). Custom Fields are where you build specific components that the user will see on a screen and need to fill in to capture the data necessary to the Issue.
Create a few Fields that might eventually be part of your Screen
Once we create the fields we think we need, we will want to build a Field Configuration. This is how we compile all the fields that we will use for our project into one bucket. This also allows us to determine which fields are required before the user can move to the next step. (NOTE: Be careful which fields you make “Required”. When marked as “Required” at this point, a user cannot even create the issue until they enter something into that field.) The Field Configuration defaults to holding all fields at first.
Create a Field Configuration. Then check the configuration to remove fields or make fields required.
Our last step in fields is to set up a Field Configuration Scheme. Again, this is a bucket that will hold all our field configurations and can also determine which Issue Type uses which Field Configuration that we built. For example, a task issue may need different fields than a schedule issue. Each Project can have only one Field Configuration Scheme where all fields reside for every Issue Type used by that Project.
Create a Field Configuration Scheme and configure that scheme by defining which Issue Types get assigned to each Field Configuration.
Don’t forget that each issue will evolve through a Workflow and will therefore need a screen that the user can view. Fields come together to form these screens. There can be as many or few fields on a screen as are needed. Screens can be repeated for different steps or different issues. But usually there will be three basic screens for each Issue Type (create, edit, & view) as well as additional screens that are needed for Transitions as the issue makes its way through the Workflow.
Create a few Screens and add the fields that you created as appropriate to each Screen.
Once you have created several screens you need to bucket these into a Screen Scheme. The Screen Scheme is the collection of screens that will eventually be assigned to your Project’s issues and workflows. Screen Schemes is also where we determine if the basic screens (create, edit, & view) will use the default screen design or a separate design using fields we have created for this specific Project. Note: Other non-basic, and transitional screens that were built will be assigned directly to their own Workflows later on in the process.
Create a Screen Scheme. Configure the Screen Scheme and define the basic screens either as the default or as one you built specifically for that basic screen
Our final process with screens is to build the Issue Type Screen Scheme and assign Issue Types to the scheme. This step is critical in linking the issues that will exist in the Project to the screen bucket that will be used in the Project. Each Project can have only one Issue Type Screen Scheme where all screen combinations reside for that project.
Create an Issue Type Screen Scheme and assign all the Issue Types that will be used in the project.
We are now reaching the top of our bottom-up JIRA construction: Workflows. A Project may have one or several Workflows. Considering our Project is related to maintenance we may need more than one Workflow. Or we may need to embed a Workflow (like “Resources”) within another Workflow (like “Asset Outage”). However, as this post does not cover Workflow methodology but rather JIRA structure, we will not be discussing the various Workflow nuances. From a structure standpoint, the Workflow is often both the first and last step to be considered. Even in a bottom-up structure approach it is often valuable to consider anticipated Workflows at a basic level before beginning to discuss needed Issue Types.
Also, Workflows are where we assign non-basic, transitional screens. If a screen is being used for a specific purpose other than the basics (create, edit, & view) we assign that screen directly into a Workflow Transition.
Create the Workflows needed for the Project. Assign any unique screens that fit into a movement stage of the Workflow to a Workflow Transition as needed.
After building our Workflows we need to create a Workflow Scheme bucket to hold them. Each project can have only one Workflow Scheme where all Workflows reside for that project.
Create the Workflow Scheme for the project and assign all Project Workflows to it.

man building up a wall by stacking up
We are now ready to build the project framework and assign all the Workflows, Screen, Field, and Issue Type Schemes. Because we followed a bottom-up approach to our JIRA framework this last step is very simple.
Create a Project. Within the Project Administration section, assign…
The Issue Type Scheme to the Issue Type Section
The Workflow Scheme to the Workflow Section
The Issue Type Screen Scheme to the Screen Section
The Field Configuration Scheme to the Field Section
Having created the JIRA structure for this Project from the bottom up, the user can now review the structure from the top down verifying whether any parts of the whole may be missing. This might include a missing Issue Type or perhaps a Field or Workflow Transition that was overlooked. However, the value of building the bottom up structure becomes realized now, because the gaps are readily noticeable and very efficiently remediated.